ข้ามไปที่เนื้อหา

Pipeline

ขั้นตอนการสร้าง Pipeline บน Azure DevOps

สำหรับ Deploy เว็บที่พัฒนาด้วย .NET ไปยัง IIS บน Windows Server

Step 1: สร้าง Personal Access Token (PAT) สำหรับ Register Agent บน Host Server

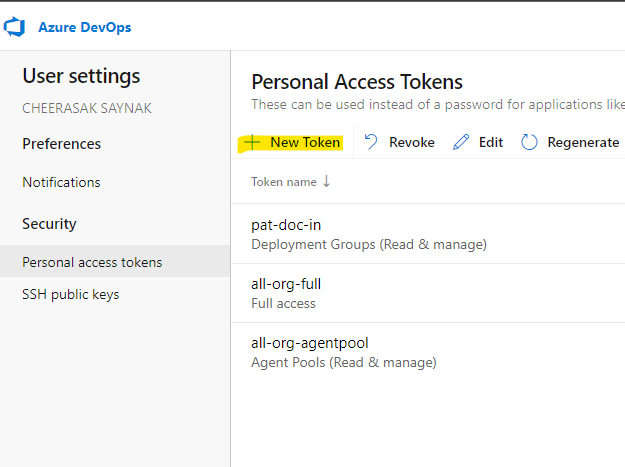
ทำสร้าง Access token สำหรับการเข้าถึง Pipeline โดยไปที่ Profile มุมขวาบนของหน้าจอ Azure Devops และเลือกเมนู Security

Management Service

เมนู Security ใน Azure Devops

Step 2: เลือก New Token

การสร้าง Personal Access Token สามารถเลือกการเข้าถึงเป็นเฉพาะ Collection หรือทุก Collection ก็ได้และระบุ All Scopes (Full Access) ระยะเวลาการหมดอายุสามารถตั้งได้ตามความเหมาะสมของการใช้งาน

Management Service

หน้า Personal Access Token

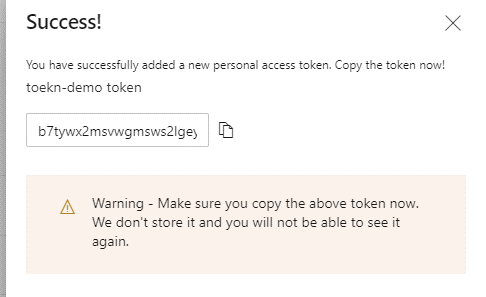
Step 3: Copy ค่า Personal Access Token

การสร้าง Personal Access Token จะไม่สามารถกลับมา Copy key เดิมได้อีกหลังจากปิดหน้าต่างไปแล้ว แต่สามารถ Revoke เพื่อสร้างใหม่ได้

Warning

PAT ควรสร้างขณะที่กำลังจะนำไปใช้งาน ไม่ควร Copy เก็บไว้ในไฟล์ใดๆเพราะเสี่ยงต่อความปลอดภัยของ Source Code

Management Service

หน้าต่างหลังจากการสร้าง PAT

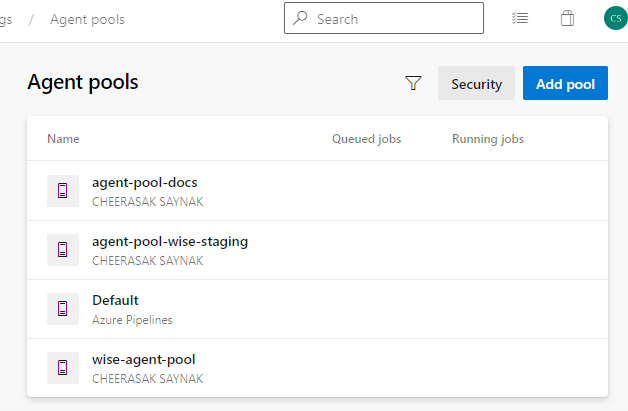
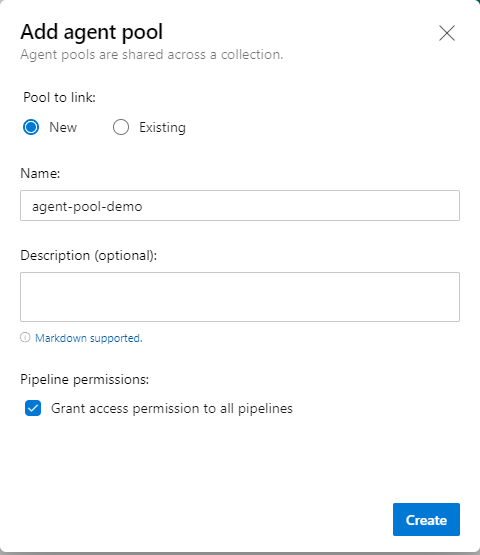
Step 4: สร้าง Agent Pool

ทำการ Register Agent Pool ภายในระบบ Azure Devops โดยการกดปุ่ม New Pool เลือก Pool to Link เป็น New และตั้งชื่อ Pool (ชื่อนี้จะใช้อีกครั้งตอน Setup Agent ใน Host Server)

Management Service

หน้า Agent Pool ใน Azure Devops

Management Service

หน้าต่างสำหรับการสร้าง Agent Pool

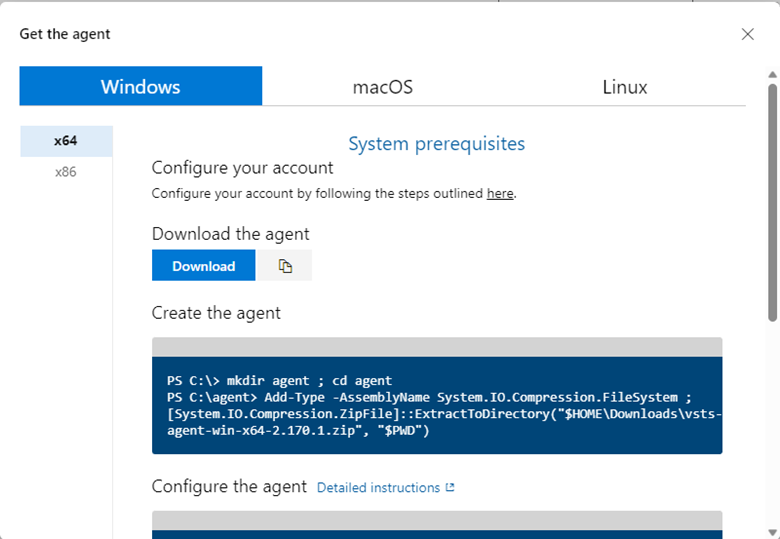
Step 5: Download Agent Setup Files และ Copy ไปยัง Host Server

หลังจากสร้าง Agent Pool แล้ว ให้กดเข้าไปภายใน Pool ที่สร้างและเลือก New Agent และทำการ Download File Agent ของ Windows ผ่านปุ่ม Download the agent หรือใช้ wget ผ่าน command line ก็ได้ (ขั้นตอนนี้สามารถทำได้จากเครื่องตนเองแล้ว Copy file ไปยัง Server หรือจะใช้เครื่อง Server เข้า Azure Devops แล้วโหลดจากภายใน Server ก็ได้)

Management Service

ขั้นตอนการ Setup Agent บน Azure Devops

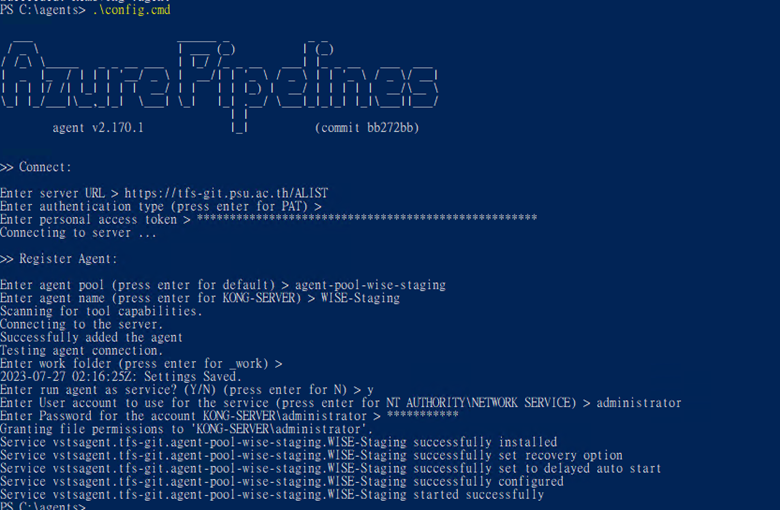
Step 6: Setup Agent ใน Host Server

Remote ไปยัง Server และ Extract ไฟล์ไว้ใน C:\Agents และ Run คำสั่งดังนี้

  • .\config.cmd
  • Server URL > https://tfs-git.psu.ac.th/[COLLECTION_NAME]
  • Authentication type > Enter
  • Personal access token > <PAT ที่สร้างไว้ในขั้นตอนที่ 3>
  • Agent pool > [AGENT_POOL_NAME ที่สร้างในขั้นตอนที่ 4]
  • Agent name > [AGENT_NAME (ตั้งชื่อให้กับ Agent)]
  • Work folder > Enter
  • Run agent as service > y
  • User account to use > administrator (หรือ user ใน group administrator)

Management Service

หน้าต่างแสดงการติดตั้ง Agent ใน Host Server

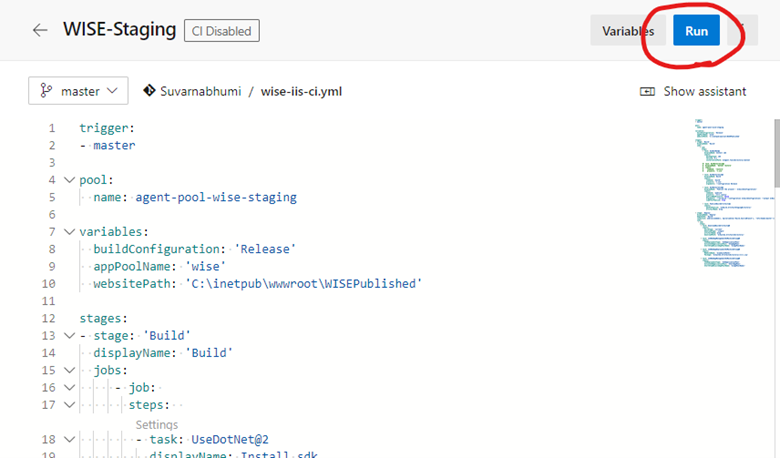
Step 7: สร้าง Pipeline จากไฟล์ .yml ต้นแบบ และแก้ไขค่าดังนี้ *** แบบอัพเดทเท่านั้นต้องติดตั้งเว็บไว้ก่อนแล้ว ***

  • Trigger : ชื่อ repo branch ที่ต้องการใช้ publish
  • Pool name: [AGENT_POOL_NAME]
  • appPoolName: ชื่อ app pool บน server ที่ต้องการ deploy
  • websitePath: path ที่ติดตั้งเว็บไซต์
  • task: UseDotNet@2 > version : ระบุเวอร์ชัน .net ที่ใช้

Management Service

แก้ไขไฟล์ Pipeline ตามจุดที่กำหนด

Template Pipeline.yml

trigger:
- master

pool:
  name: [AGENT_POOL_NAME]

variables:
  buildConfiguration: 'Release'
  appPoolName: '[SITE_APP_POOL_NAME]'
  websitePath: '[SITE_FILE_PATH]'

stages:
- stage: 'Build'
  displayName: 'Build'
  jobs:
     - job: 
       steps:  
        - task: UseDotNet@2
          displayName: Install sdk
          inputs:            
            packageType: sdk
            version: [DOT_NET_SDK_VERSION]
            installationPath: $(Agent.ToolsDirectory)/dotnet

        #- task: DotNetCoreCLI@2
        #  displayName: 'dotnet restore'
        #  inputs:
        #    command: 'restore'
        #    projects: '*.sln'

        - task: DotNetCoreCLI@2
          displayName: Build
          inputs:
            command: 'build'
            projects: '*.sln'
            arguments: --configuration Release

        - task: DotNetCoreCLI@2
          displayName: 'Publish the project - $(buildConfiguration)'
          inputs:
            command: 'publish'
            projects: '**/*.csproj'
            publishWebProjects: false
            arguments: '--no-build --configuration $(buildConfiguration) --output $(Build.ArtifactStagingDirectory)/$(buildConfiguration)'
            zipAfterPublish: true

        - task: PublishBuildArtifacts@1
          inputs:
            pathToPublish: '$(Build.ArtifactStagingDirectory)'
            artifactName: drop

- stage: 'Deploy'
  displayName: 'Deploy'
  dependsOn: 'Build'
  condition: and(succeeded(), eq(variables['Build.SourceBranch'], 'refs/heads/master'))
  jobs:
   - job:
     steps: 
      - task: DownloadBuildArtifacts@0
        inputs:
          buildType: 'current'
          downloadType: 'single'
          artifactName: drop
          downloadPath: '$(System.ArtifactsDirectory)'

      - task: IISWebAppManagementOnMachineGroup@0
        inputs:            
          IISDeploymentType: 'IISApplicationPool'
          ActionIISApplicationPool: 'StopAppPool'
          StartStopRecycleAppPoolName: '$(appPoolName)'

      - task: IISWebAppDeploymentOnMachineGroup@0
        inputs:
          WebSiteName: '$(websitePath)'
          Package: '$(System.ArtifactsDirectory)\**\*.zip'

      - task: IISWebAppManagementOnMachineGroup@0
        inputs:            
          IISDeploymentType: 'IISApplicationPool'
          ActionIISApplicationPool: 'StartAppPool'
          StartStopRecycleAppPoolName: '$(appPoolName)'

Step 7: เพิ่มไฟล์ไปยัง Source Code และ Push ไปยัง Repository

นำ Pipeline.yml เก็บไว้ใน Source Code เพื่อที่จะนำไป Import Pipeline จาก Source Code ในลำดับถัดไป

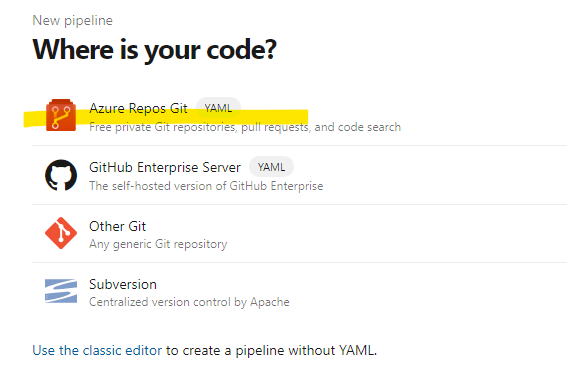
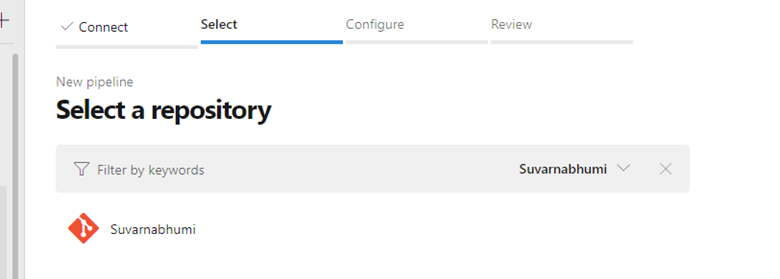
Step 8: สร้าง Pipeline ใหม่

ไปที่หน้า Pipelines เลือก New Pipeline เลือก Azure Repos Git (YAML) เลือก Repository เป็น Repository Source Code ของเราและเลือก Existing Azure Piepline YAML file

Management Service

กดปุ่ม New Pipeline ในหน้า Azure Pipelines

Management Service

เลือก Azure Repos Git (YAML)

Management Service

เลือก Source Code Repository

Import from .yml

เลือก Existing Azure Piepline YAML file

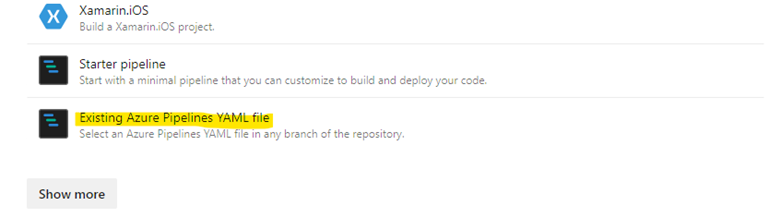
Step 9: เลือกไฟล์ Pipeline .yml ที่ได้สร้างไว้ใน Source Code และกด Run

.yml selecting

เลือกไฟล์ .yml ใน Source Code

Run pipeline .yml

Run Pipeline